2020年09月30日
How to Replace the Samsung S20 Charging Port PCB Board
1. Tear down the Samsung S20 back housing and take off the wireless charging coil
Firstly, we need to tear down the back housing. Power off the phone and take out the SIM card tray. Use a hot air gun to blow on the edge and corners of the back housing. Use a suction cup to pull and an ultra-thin plastic panel to slice and separate the back housing. Flip and remove it away after it is separated. Unbolt the eleven screws for fixing the wireless charging coil, disconnect the BTB interface cable. Pry and take off the charging coil with a steel prying tool. Just be careful and don’t break the flex.
2. Take off the bottom loudspeaker bracket and replace the charging port PCB board
Loosen the five screws for fixing the bottom loudspeaker bracket. Take off the bracket slowly. Disconnect the battery flex cable, the SUB mother board flex and the antenna flex with a spudger. Take off the flexes from the phone. Undo the five screws for fixing the Samsung S20 charging port PCB board, then we are able to take off the board. Use the steel prying tool to pry out and take off the charging port PCB board. Install the new PCB board into the phone, fixing it with the five screws.
3. Assemble the Samsung S20 phone and test the new replaced charging port
Connect the SUB mainboard flex and the antenna flex back. Assemble the bottom loudspeaker bracket back, and fix it with the five screws. Connect the battery flex cable after that. Install the wireless charging coil back and fixing it with the eleven screws. Assemble the back housing to the phone. Gently press on the back to seal up the phone. Insert the Samsung S20 SIM card tray back. Turn on the phone and plug the USB charger to check if the charging port is normal.
The whole process above may be a little complicated for a new repair beginner. Besides, we should be careful on slicing and tearing down the back housing because it is easy to be broken. There are many flex cables inside, don’t misconnect the cables. What’s more, Etrade Supply offers new replacement parts for Samsung Galaxy S20 repair. Come to our online store if you are looking for Samsung swappable parts.

Article resources from Etrade Supply Blog of: How to Replace Samsung S20 Charging Port PCB Board
2020年09月26日
How to Fix the iPhone 11 Face ID Issue
1. Tear down the iPhone and take out the face ID module
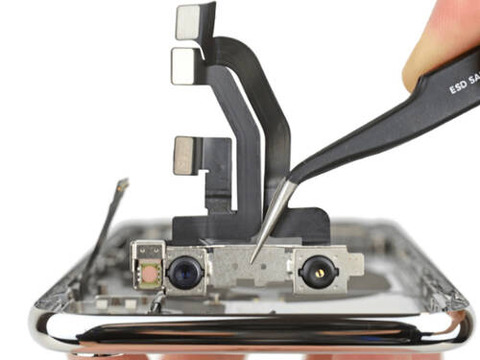
Unbolt the two pentalobe screws on the bottom. Slice and pry up the display screen, then loosen the screws and remove the metal shield for fixing the display flex cables. Disconnect the flex cables and separate the display screen completely afterward. Here we can see the face ID module in the upside, which is combined with the two front cameras. Apply pieces of heatproof protector film on the cameras in case of damaging the cameras. Use a steel pry tool and tweezers to take down the face ID module.
2. Separate the dot projector flex and record the data with JC Pro 1000S programmer
Connect the face ID cameras module to the JC Pro 1000S programmer. Back up the data to the programmer. Unplug the flex connector and connect a new dot projector flex to the programmer after that. Copy the data to the new flex. Install and connect the face ID cameras module back to the iPhone for testing. Power on the iPhone if no “Unable to activate Face ID on this iPhone” shows, means the dot projector flex data is successfully backup.
3. Separate the dot projector from the face ID module and take off the disk
Firstly, tear off the heat-resistant sticker from the Face ID module. Grind the metal shield and heat up with a hot air gun to separate remove the shield from the model. Continue to heat up on the dot projector flex until it is separated from the model with a prying tool. Hot air blowing on the flex to separate the disk from it.
4. Short connect the power supply diode on the disk and install it on the new dot projector flex
Plate tin on the new dot projector flex, and clean the flex with PCB cleaner. Separate the dot projector from the module. Remove the short-circuited diode from the disk under hot air gun blowing. Plate tin on the diode position, and apply the disk on to the new dot projector flex under hot air gun blowing. Connect the flex to the JC Pro programmer and test if it is normal. Assemble the flex to the iPhone 11 integrated front-facing cameras module with 460 glue, make sure it is on the exact position.
5. Install the new dot projector flex on the Face ID module, and install the module back to iPhone
Connect the face ID module to the iPhone and test the face ID function. Go to Settings >> Face ID & Passcode and set up the face ID. Here we can see the face ID function is normal. Try to turn off the screen and unlock the iPhone with face ID after it is set up successfully. Face ID is normal, the issue is fixed. Reassemble the iPhone 11 display screen and digitizer, all procedure is finished.
The iPhone face ID recognition problem can be many reasons, we kindly advise our users to check out the reason. Also, you may come to Etrade Supply for iPhone 11 replacement parts for wholesale if you are looking for iPhone parts for repair. You may also contact us if you have questions about iPhone repair. We are glad to help.
2020年09月18日
How to Replace the iPad Air 3 Headphone
1. Tear down the iPad Air 3 display screen
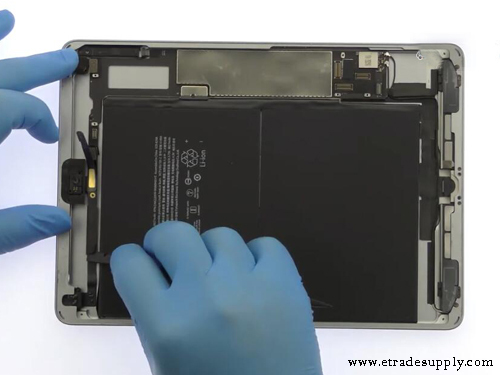
Firstly, we need to power off the iPad. Use 80℃ hot air gun to blow around the edge and four corners for 1-2 mins. Use hard plastic plectrum and metal prying tool to slice around and separate the display. Gently pry and flip up when the iPad display is separated. Unbolt the two screws and take off the metal shield with tweezers. Disconnect the display flex cables and take the display screen away after it is separated completely. Snap off the four screws and remove the metal shield for fixing the internal parts. Here we can see the earphone on the up left side of the iPad.
2. Take off the iPad Air 3 headphone and replace the new one
Disconnect the headphone jack flex. Loosen the screws for fixing the earphone. Use the metal prying tool to pry and separate the earphone flex cable ribbon. Take off the iPad Air 3 earphone with flex cable ribbon from the iPad after it is totally separated. Install the new earphone into the original place and fix it with the screws back. Connect the earphone flex cable to the iPad. Gently press on the flex cable ribbon to make it adhesively paste on the panel. Place the metal shield back and fixing it with the screws.
3. Reassemble the display and test the headphone function
Reverse the teardown step orders. Connect the iPad Air 3 LCD display screen flex cables back and place the metal shield back. Tighten the screws for fixing the flex cables. Assemble the display screen back but past the frame adhesive glue beforehand. Place the display back to the original position, slightly press on the edge, and each corner to make sure it is strictly sealed. Turn on the iPad to test the earphone, check if it is working normally.
As a final notice, the iPad LCD displays screen is easy to break which needs our extra carefulness while tearing down. Don’t try to do it yourself on your iPad at home if you are not familiar with the iPad repair procedure. You may also come to Etrade Supply if you are looking for iPad Air parts for replacement. Contact us if you have any problems with our product or iPad repair, we are glad here to help you.
2020年09月12日
How to Recover True Tone on an LCD iPhone 11 Display Screen
1. Tear down the iPhone 11 display screen
Turn off the iPhone and take out the SIM card tray. Unbolt and remove the two pentalobe screws on the bottom. Use suction cup and hard plastic plectrum to slice and separate the display screen. Loosen the six Phillips screws and take off the metal shield. Disconnect all the display flex cables and separate the display screen. Snap off the screws and take off the iPhone 11 ear speaker with the sensor flex from the display screen. Unscrew the nine Y-type screws and separate the metal backlight plate from the display.
2. Transmit the display data from the original display screen to the new LCD display screen
Connect the original display screen to the JC V1 programmer. Turn on the programmer and backup the original display data. Unplug the display and then connect the new display screen and rewrite the data to the new iPhone 11 LCD display. Unplug the display after it is finished. Remove the tape on the flex. Tighten the screws and assemble the metal backlight plate to the new LCD display. Install the ear speaker and the sensor flex to the new display.
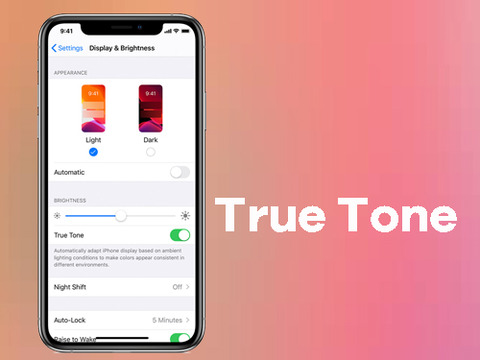
3. Install the new display screen to iPhone and test the true tone function, and then reassemble the phone
Clear the remaining adhesive glue on the frame. Past a new frame waterproof adhesive glue on the frame. Connect the new display screen to the iPhone. Turn on the iPhone to test the new replaced iPhone 11 display screen and digitizer. Go to Settings >> Display & Brightness to turn on true tone. Check the screen effect and the auto-brightness sensor. If all these functions are working well, then turn off the phone. Place the metal shield and tighten the screws back for fixing the display flex cables. Assemble the display screen back. Insert the SIM card tray back. All process is finished.
This solution works on most iPhone models and the process is simple. We can still consider to replace our iPhone 11 display screen with an LCD one since it cost us less than the original one if necessary. Besides, you can come to Etrade Supply for high-quality iPhone 11 LCD display screen if you need to replace your iPhone screen. Here we have 100% new LCD display screens and small iPhone parts as well for wholesale. Contact us if you have interested.
2020年09月04日
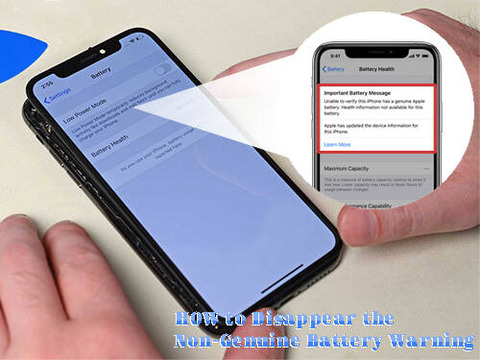
How to Disappear the iPhone Non-Genuine Battery Warning
When we swap our iPhone battery with the third-party battery, there will be a message of non-genuine battery warning pop-up on the screen when we turn on the phone. This makes the awkwardness and frustration to our customers, although the newly replaced battery is good. Here Etrade Supply would like to show you tricks on how to make the warning message disappear for a month, without tearing down the iPhone and the battery.
>> Step 1: Turn on the phone, switch off the Wi-Fi WLAN and Bluetooth. Open Airplane mode.
>> Step 2: Go to General > Date & Time, adjust the time to a month later
>> Step 3: Turn off the iPhone and then restart, go to Settings > General > Date & Time, swipe on Set Automatically
>> Step 4: Turn off Airplane mode, Swipe on Wi-Fi WLAN and Bluetooth, power off the iPhone
>> Step 5: Restart the phone again, the pop-up warning message disappears. We don’t have to tear down the new iPhone 11 battery.
Notice: The procedure will be successful disappear the pop-up warning message for a month, but the non-genuine warning is still on Settings of the battery health. If you want to erase the warning permanently, you will have to tear down the battery and swap the battery management system board. Specific steps refer to Etrade Supply blog of: How to Erase the Non-Genuine Battery Warning on iPhone . You may also go to Etrade Supply for new iPhone swap parts such as iPhone LCD display screen and small parts if you have interests.